How to Build a Wood Fence Gate: A Complete DIY Guide


How to Build a Wood Fence Gate: A Complete DIY Guide
A well-built wooden fence gate does more than mark your property line it frames your entrance, provides security, and sets the tone for your entire yard. The difference between a gate that sags after one winter and one that stays solid for decades often comes down to three things: proper framing, correct hardware selection, and attention to the details during installation.
I've spent over a decade covering home improvement projects, and I can tell you that building a wood fence gate is one of those tasks where DIYers consistently either nail it or completely mess it up. The ones that fail usually cut corners on the frame. The ones that succeed follow a process that isn't complicated but demands precision at each stage. This guide walks you through every step, from selecting materials to hanging the finished gate.
Planning Your Wood Fence Gate
Before you buy a single board, you need to measure your opening accurately. Gate width is the critical starting point too wide and you'll fight sagging from day one; too narrow and you won't have room for the hardware that makes the gate function properly.
Measure the opening at the top, middle, and bottom. If these measurements vary by more than half an inch, you'll need to account for that during build planning. Use the smallest measurement as your gate width reference, then subtract an additional 1/2 inch for clearance and 1 inch for the latch hardware. This gives you your final frame width.
Height matters too. Your gate should match or slightly complement your existing fence, but standard residential gates run between 42 and 48 inches tall for single openings. If you're building the fence and gate together from scratch, plan for the gate opening to be the same height as your fence line.
Choosing Materials for Your Gate
Not all wood is created equal for outdoor gate construction. The wood you choose needs to resist warping, rot, and insect damage while maintaining structural integrity under its own weight and wind load.
Recommended Wood Species
- Cedar Naturally rot-resistant, beautiful grain, and relatively lightweight. It's the gold standard for residential fencing. Western red cedar and incense cedar perform best.
- Redwood Similar benefits to cedar with richer color. More expensive and less widely available in some regions.
- Pressure-treated pine The budget option that performs well when properly sealed. Heavier than cedar, which puts more stress on hardware.
- Cypress Another rot-resistant option with good workability. Often cheaper than cedar in the Southeast United States.
Avoid untreated pine or fir for gate construction they'll warp within the first season and you'll be rebuilding before you've even finished your landscaping.
Essential Hardware
The hardware you select determines how long your gate lasts. Cheap hinges and latches today mean a sagging gate tomorrow.
- Gate hinges Look for heavy-duty, rust-resistant options. Ball-bearing hinges last longest and provide smooth operation. For a standard 4-foot gate, 3-inch hinges minimum.
- Gate latch A thumb latch or lever-style latch works for walk-through gates. For drive gates, consider a ring latch or remote-operated gate opener.
- Gate frame hardware Exterior-rated screws (not nails) for assembly. Metal brackets for corner reinforcement.
- Post hardware Hinge pins that bolt through the fence post, not just screws into wood.
Building the Gate Frame: Step by Step
The frame is where most DIY gates go wrong. A gate isn't just boards nailed together it's a structural system that needs to handle weight, wind, and daily use. Here's how to build one that lasts.
- Cut your frame boards to final width. Measure your gate opening, subtract clearance, and cut your horizontal frame boards (called rails) to length. For a gate up to 4 feet wide, use two horizontal rails. For wider gates, use three.
- Assemble the outer frame. Lay out your frame boards on a flat surface. Use a speed square to ensure corners are exactly 90 degrees. Pre-drill holes and attach boards with exterior-rated screws 3-inch screws for 2x4 framing.
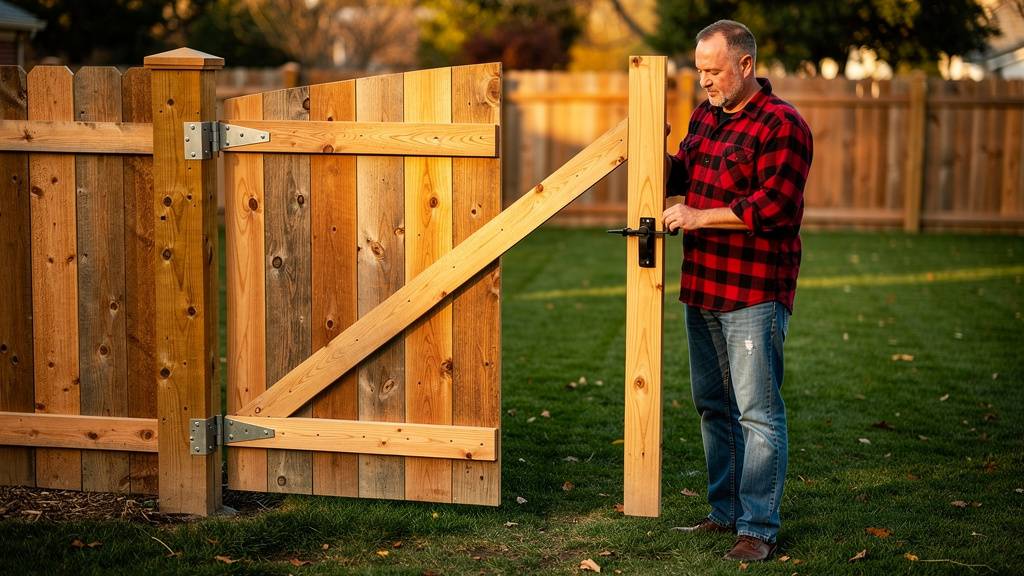
- Add diagonal bracing. This is the secret to a gate that doesn't sag. Cut a 2x4 to run from one bottom corner to the opposite top corner. The diagonal should angle upward toward the hinge side this counters the weight of the gate pulling down on the hinges. Attach with screws or metal brackets.
- Install vertical boards. Measure and cut your vertical fence boards to span from the top rail to the bottom rail. Attach each board with two screws per rail that's four screws per board total. Space boards consistently, typically 1/4 to 1/2 inch apart for privacy-style gates.
- Square and check. Measure diagonally from corner to corner. When both measurements are equal, your gate is square. Clamp or brace it in this position while finishing.
"The single biggest mistake I see is DIYers skipping diagonal bracing or installing it in the wrong direction. A gate without proper bracing will sag within months it's not a matter of if, it's a matter of when." Mark Jenkins, owner of Jenkins Fencing in Portland, Oregon
Types of Wood Fence Gates
Different gate styles serve different purposes. Here's how they compare:
Board-on-board gates overlap vertically, leaving no gaps while allowing some air flow. Shadowbox gates use alternating boards that overlap at edges, creating a semi-private look that looks good from both sides. Picket gates are classic but offer minimal security they're more decorative. Louvered gates add slats at an angle for airflow while maintaining privacy.
Hanging Your Gate: The Critical Details
Building a great frame is only half the battle. How you hang it determines whether that frame performs well over time. The posts your gate hangs from must be substantial they're bearing the entire load.
Your gate posts should be 4x4 minimum, set in concrete at least 24 inches deep. The post the hinges attach to is taking the most weight, so if you're mounting to an existing fence, make sure that post is firmly anchored. If it wobbles, your gate will wobble.
When mounting hinges, space them as far apart as practical the wider the hinge spread, the less strain placed on each hinge. Mount the top hinge first, then adjust the bottom hinge to achieve level. Use a level throughout this process. The gate should hang straight, not tilted.
Install your latch at approximately 36 inches from the ground standard handle height. Make sure the latch engages cleanly with the strike plate. A latch that requires forcing will stress the entire frame and cause premature wear.
Applications and Benefits
A properly built wooden fence gate adds real value to your property. Beyond the obvious security benefits, it creates a defined entrance that improves curb appeal. Wood gates blend with landscaping in a way that metal or vinyl options simply can't match.
The beauty of building your own gate is customization. You can match your exact fence style, choose your wood species for color and grain, and build the gate to any width your opening requires. Pre-made gates at home centers are limited to standard sizes and often use inferior materials.
From a cost perspective, building your own gate typically runs 40 to 60 percent less than buying a comparable pre-made gate, and the result is higher quality because you control the materials and construction methods.
Best Practices and Pro Tips
- Seal all cut ends. Every time you cut a board, the end grain is exposed and vulnerable to moisture absorption. Apply end-seal preservative or wood sealer to every cut end before installation.
- Use screws, not nails. Nails work loose over time with gate movement. Exterior-rated screws (either coated deck screws or stainless steel) hold indefinitely.
- Account for wood movement. Wood expands and contracts with moisture. Leave a tiny gap between boards during dry weather that gap will close when humidity rises.
- Add a gate wheel. For gates over 4 feet wide or in wind-prone areas, install a ground-mounted wheel to support the latch side. This dramatically extends hardware life.
- Apply a finish before hanging. It's easier to seal and stain all surfaces before the gate is mounted. Don't forget the bottom edge it's most vulnerable to moisture wicking.
Common Mistakes to Avoid
Several mistakes consistently plague DIY gate builds. The first is undersizing the frame. Using 2x3s or even 1x boards for framing because they're what's left in the garage leads to immediate structural problems. Your frame should be 2x4 minimum, and 2x6 is better for wider gates.
The second common error is inadequate post anchoring. A gate is essentially a sail attached to a post. Wind catches it, and if that post isn't firmly set, the entire gate system fails. Concrete footings 24 inches deep are standard, and in frost-prone climates, go deeper to the frost line.
Third: ignoring the diagonal brace direction. The brace must run from the bottom hinge-side corner up to the top latch-side corner. Running it the other way actually accelerates sagging because it works with the gravity load rather than against it.
Finally, there's the clearance mistake. New gates fit perfectly when built, then swell in humid weather and drag on the ground. Always build with at least 1/2 inch clearance at the bottom, more in humid climates.
Maintenance and Longevity
A well-built wood gate lasts 15 to 20 years with reasonable maintenance. The key is staying ahead of deterioration. Inspect your gate twice yearly spring and fall are ideal looking for loose screws, cracked boards, and signs of rot at the bottom edge where moisture collects.
Re-seal or re-stain your gate every 2 to 3 years, or whenever water stops beading on the surface. This simple maintenance habit is what separates gates that last decades from those that need rebuilding every few years.
Keep vegetation trimmed back from your gate. Plants pressing against wood create moisture pockets and shade that accelerates rot. A clear 6-inch clearance around the gate frame is ideal.
Frequently Asked Questions
How wide can I build a wooden gate before it starts sagging?
With proper diagonal bracing and appropriate hardware, a single wooden gate can span up to 6 feet reliably. Beyond that width, consider a double-gate (pair) design or adding a center support post. The wider the gate, the more critical diagonal bracing and heavy-duty hardware become. Gates over 6 feet benefit significantly from a ground wheel on the latch side to reduce strain.
Should I use cedar or pressure-treated pine for my gate?
Cedar is generally superior for gate construction it's naturally rot-resistant, lightweight, and resists warping better than pressure-treated pine. However, pressure-treated pine performs acceptably when properly sealed and costs significantly less. If budget is primary, treated pine works fine. If longevity and ease of working are priorities, cedar is worth the investment.
How do I fix a sagging wooden gate?
First, tighten all hinge screws often the screws have worked loose. If the post is solid but the gate has sagged, you can add a turnbuckle cable system to the diagonal bracing, which pulls the gate back into square. For severe sagging, you may need to remove the gate, add or correct the diagonal bracing, and re-hang. Adding a ground wheel to the latch side also helps by taking weight off the hinges.
Do I need a permit to build a fence gate?
Permit requirements vary by municipality. Most residential fence gates under 6 feet tall don't require permits, but front-yard gates often have different rules than backyard gates. Height restrictions and setback requirements typically apply. Check with your local building department before starting the cost of a permit is far less than the cost of removing an non-compliant structure.
What's the best way to attach a gate to a masonry or brick post?
Masonry posts require different hardware than wood posts. Use expansion anchors or epoxy-set threaded rods rated for the weight you're supporting. Drill pilot holes with a masonry bit, then install the anchors. The hinge mounting must be absolutely secure a gate swinging on loose masonry anchors will crack the brick or concrete.
Key Takeaways
- Measure your gate opening accurately and subtract 1/2 inch for clearance plus 1 inch for hardware before cutting your frame boards.
- Use 2x4 or 2x6 framing lumber for the gate frame avoid thin materials that can't handle the weight and stress.
- Install diagonal bracing from bottom hinge-side to top latch-side to prevent sagging; this single step determines gate longevity.
- Select heavy-duty, rust-resistant hinges and mount them as far apart as practical to reduce leverage stress.
- Seal all cut ends and apply finish to all surfaces before hanging the gate for maximum protection.
- Add a ground wheel for gates over 4 feet wide or in wind-exposed locations to extend hardware life.
- Re-seal or re-stain the gate every 2-3 years to maintain wood protection and extend the gate's lifespan.